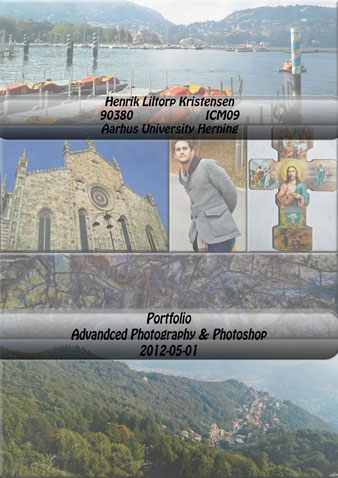
6.semester Portfolio – Advanced Photography & Photoshop
Mit portfolio fra 6. semester som indeholder billeder, som jeg enten har taget, taget og redigeret eller designs lavet fra bunden i Adobe Photoshop. Jeg sætter det op som det stod i min endelige aflevering med et par enkelte fodnoter. Opgaven var på engelsk, derfor vil det næste også komme til at stå på engelsk af samme grund.
My portfolio from 6th semester, which include pictures that I have either taken, taken and edited, or designed from scratch in Adobe Photoshop. I have inserted the portfolio as it was in my final delivery but with a few footnotes.
Frontpage
General Information
Photo taken by: Henrik Liltorp
Camera: Nikon D3100 & Samsung GT-I9000
Location: Como, Milanello (The Man) & Herning (The Cross)
Copyright: Henrik Liltorp
Photoshop
In photoshop I’ve used an empty file to put my images together and adding styling to them bevel and emboss etc.
01: The Streets of Milan
General Information
Photo taken by: Henrik Liltorp
Camera: Nikon D3100
Copyright: Henrik Liltorp
Location: Milan
Date taken: 2012-04-06
Purpose
The purpose was to get a picture of that interesting setup of a red bike and a very crocked building.
Camera Techniques
The image has a very good depth which I tried to show more thoroughly. The rule of thirds has also been applied.
Bridge Camera Raw
The photo has been edited in Camera Raw regarding exposure, sharpness, contrast, lighting, etc.
Several colours has been changed and made stronger.
Photoshop
In Photoshop the clone stamp tool has as the only tool been used to clean up the image for deleting dirt on the road and similar actions.
02: Il Duomo..!
General Information
Photo taken by: Henrik Liltorp
Camera: Nikon D3100
Copyright: Henrik Liltorp
Location: Milan
Date taken: 2012-04-06
Purpose
The purpose was to take a real good picture of the cathedral in Milano, which were showing off all the details in the construction.
Camera Techniques
The picture is taken from frog’s perspective to help really bring fought the appearance of the cathedral. It has also been shot a bit from the side to show some of its size and depth.
Bridge Camera Raw
The photo has been edited in Camera Raw regarding exposure, sharpness, contrast, lighting, colour correction etc. The basic darkening of the image to make it look gloomy was made in Raw as well as it was cropped.
Photoshop
In Photoshop I continued what I started in Camera Raw. I created an extra layer set to overlay mode with a mask and the brush tool selected the entire cathedral so it was only the sky the overlay applied to. Then I added a gradient with low opacity to make a difference in the clouds amount of darkness. Then I added mattingàdefringe to the selection to get rite of the white edge. After that I added HUE/Saturation layers to both the selection of the cathedral and of the sky. Finally I added a bit of brightness to darken the sky the last part.
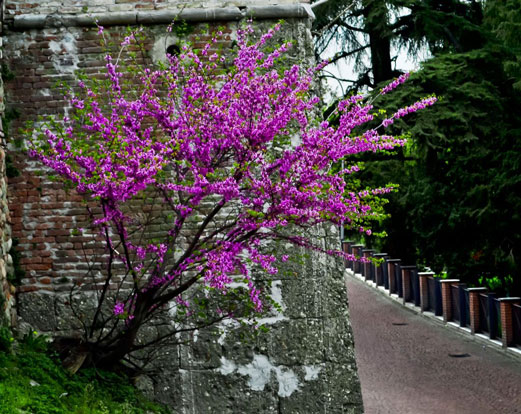
03: A Glimse of Castellanza
General Information
Photo taken by: Henrik Liltorp
Camera: Nikon D3100
Copyright: Henrik Liltorp
Location: Castellanza
Date taken: 2012-04-03
Purpose
The purpose is to show the difference between the pink plant, the brick wall and the road.
Camera Techniques
The picture is taken a bit from bird’s eye view and together with the road and stairs going up giving an interesting perspective to the picture. Some clear lines in the picture are also to be fined to divide it to sections.
Bridge Camera Raw
The photo has been edited in Camera Raw regarding exposure, sharpness, contrast, lighting, colour correction etc. The colours of the flowers on the plant have been emphasized also the image has been cropped.
Photoshop
In Photoshop an adjustment layer has been used with a mask to lighten the trees in the background.
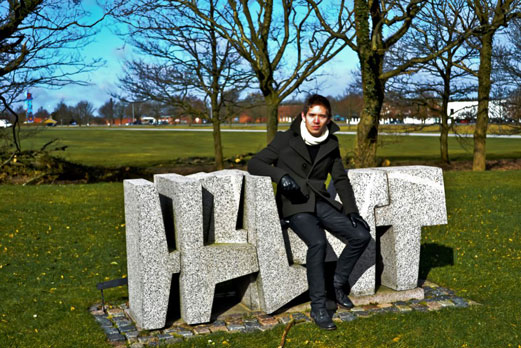
04: An Aussie Lost in Denmark..!
General Information
Photo taken by: Henrik Liltorp
Camera: Nikon D3100
Copyright: Henrik Liltorp
Location: Birk
Date taken: 2012-03-13
Purpose
Have a memory of my roommates visit in Denmark and to get some pictures with people in them.
Camera Techniques
As it was very bright and sunny that day I had the sun behind me so I didn’t had to shot towards the sun. The target is placed one third in from the right. The picture also has a good depth with a foreground of the person, a centre of the trees and a background of the road and the buildings.
Bridge Camera Raw
The photo has been edited in Camera Raw regarding exposure, sharpness, contrast, lighting, colour correction etc.
Photoshop
In Photoshop I used a selection made in channels with the blue layer which was adjusted with levels to darken the lightest parts of the image. After that I used an adjustment layer with layer mask of the same selection to make the last details darker. Finally I used burn tool on a few areas around the changed area to make the difference seem better.
05: The Candlelight
General Information
Photo taken by: Henrik Liltorp
Camera: Nikon D3100
Copyright: Henrik Liltorp
Location: Herning
Date taken: 2012-02-18
Purpose
The purpose was to capture a picture where it was possible to manipulate with the colours that were created by the flame on the side off the dark light.
Camera Techniques
The red part of the candle, which is the main part of the candle, is one third in from the right. The front is in focus whereas the background is faded out a bit. The close up of the candle also creates a certain mood.
Bridge Camera Raw
The photo has been edited in Camera Raw regarding exposure, sharpness, contrast, lighting etc. It has also been used to emphasize the red and yellow in the picture.
Photoshop
In Photoshop I have added a layer style (outer glow) to the image and also replaced the background of the image with a background made in Photoshop portraying a piece of wood to make the image cosier. For the wood I used a number of filters, the liquify tool and made an extra layer set to hard light with low opacity. Finally I used the dodge and burn tools to make light and shadow part compared to where the candle is placed on the image followed by refining the edge on both candle and the wood background.
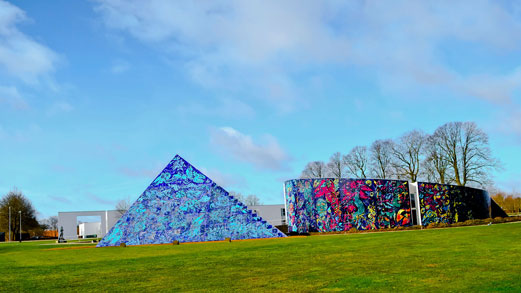
06: A Spring Day in Birk
General Information
Photo taken by: Henrik Liltorp
Camera: Nikon D3100
Copyright: Henrik Liltorp
Location: Birk
Date taken: 2012-03-13
Purpose
The purpose was to capture the amazing colours of the museum.
Camera Techniques
The rule of thirds has been applied according to the level between grass and sky and the museum is one third in from the right.
Bridge Camera Raw
The photo has been edited in Camera Raw regarding exposure, sharpness, contrast, lighting, colour correction etc. The colours on the building have been made stronger and the picture has been cropped.
Photoshop
In Photoshop I have used several adjustment layers with masks to make neutralize and lighten some of the colours on the image without changing the buildings or the grass.
07: A Milan Square
General Information
Photo taken by: Henrik Liltorp
Camera: Nikon D3100
Copyright: Henrik Liltorp
Location: Milan
Date taken: 2012-04-08
Purpose
I wanted to take a picture of the combination the sculpture, trees and a typical Milan square
Camera Techniques
The rule of thirds has been applied according to the sign in the right. The photo has also been taken as a landscape picture.
Bridge Camera Raw
The photo has been edited in Camera Raw regarding exposure, sharpness, contrast, lighting, colour correction etc.
Photoshop
In Photoshop I’ve added some adjustment layers to the picture to darken the sky and neutralize the lighting of the picture a bit. Furthermore I have removed the top right building from the picture and the sign that was in the centre via the clone stamp tool.
08: The Fountain at Castello Sforzesco
General Information
Photo taken by: Henrik Liltorp
Camera: Nikon D3100
Copyright: Henrik Liltorp
Location: Milan
Date taken: 2012-04-06
Purpose
To take a picture of the fountain and the water splashes that showed it in all its beauty.
Camera Techniques
The picture has been taken from a frog’s perspective so the fountain and the sky come together with the contrast. It has also been taken a bit crocked to so all the water splashes is visible. The rule of thirds has been applied with the building in the background.
Bridge Camera Raw
The photo has been edited in Camera Raw regarding exposure, sharpness, contrast, lighting, colour correction etc.
Photoshop
A brightness adjustment layer has been used on the image to make it lighter and with a layer mask with gradient some of the image has kept its darker view.
* This picture is taken the exact same place as number 08: The Artist and number 15: Riding my Bike.
09: The Eagle Eye
General Information
DSC_0448:
Photo taken by: Henrik Liltorp
Camera: Nikon D3100
Copyright: Henrik Liltorp
Location: Milan
Date taken: 2012-04-06
954318_17559927:
Photo taken from: Stock
Camera: Olympus SP550UZ
Copyright: No Copyright
Date taken: 2008-02-14
Link: http://www.sxc.hu/browse.phtml?f=download&id=954318
Purpose
DSC_0448: By taking pictures of the roof in a gallery I hoped to get some special and different pictures that could be useful.
Bridge Camera Raw
The photos have been edited in Camera Raw regarding exposure, sharpness, contrast, lighting, colour correction etc. The image “DSC_0448” has also been cropped.
Photoshop
DSC_0448: I made the canvas bigger all way around the image painted the extra part in a strong colour that didn’t look anything like the actual image, so a clear difference was there. Then I started make the circle complete via clone stamp tool, so I could get a circle with the black ring as the outer. Then I made a selection of that ring as big as possible via the elliptical marquee tool. Then I had my circle that I could use.
954318_17559927: The circle I inserted in the picture as the centre of the eye of the eagle and added a drop shadow. After that I used an adjustment layer with a layer mask to lighten the green part left of the eagle to make the image look more even. Finally I used liquify tool to make the eagle’s beacon and eye bigger so it looked better with the artificial eye.
10: The Artist
General Information
Photo taken by: Henrik Liltorp
Camera: Nikon D3100
Copyright: Henrik Liltorp
Location: Milan
Date taken: 2012-04-06
Purpose
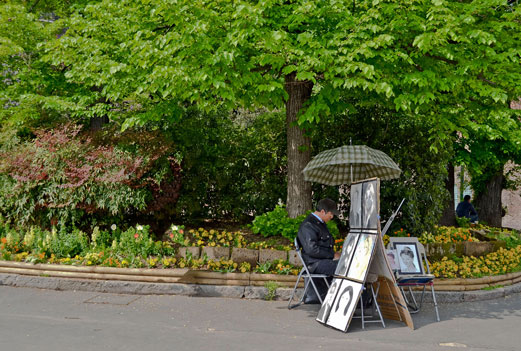
To try to capture the everyday in a big city of the people who live there. There is also a great contrast between the painter and the flowers in the background.
Camera Techniques
The object of interest is one third up from the bottom. The image has a good depth with the artist as foreground, flowers and trees as centre and the castle as background. I think of the picture as a “capture the moment” picture because as I shot he was very concentrated in painting.
Bridge Camera Raw
The photo has been edited in Camera Raw regarding exposure, sharpness, contrast, lighting, colour correction etc. It has also been cropped.
Photoshop
I have deleted object in front of the flowers using first a selection of it then press delete → fill → content aware. This I did to give me an idea how to make it look because it is such a big area that needs to be redone, then I used clone stamp tool to make it look better.
11: The West Wind
General Information
Photo taken by: Henrik Liltorp
Camera: Nikon D3100
Copyright: Henrik Liltorp
Location: Rome
Date taken: 2011-10-30
Purpose
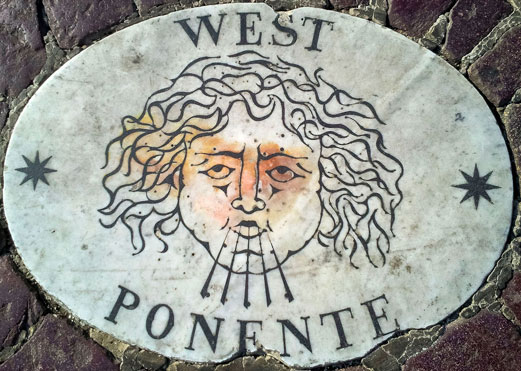
The picture is taken for several reasons. First of all because it is from Saint Peter’s Square. Second because it is the statue that is in “Angels and Demons” and I took the picture of that one over 11 over because of that.
Camera Techniques
I took the picture close to get all the details of the statue and so the bright sun that shined that day wouldn’t spoil the picture by reflecting on the stone.
Bridge Camera Raw
The photo has been edited in Camera Raw regarding sharpness, contrast, lighting, colour correction etc. Furthermore the magenta and purple stones has been highlighted.
Photoshop
In Photoshop I have used an adjustment layer to improve the contrast. The image has been cropped as well.
12: Beauty in an Alley
General Information
Photo taken by: Henrik Liltorp
Camera: Nikon D3100
Copyright: Henrik Liltorp
Location: Milan
Date taken: 2012-04-05
Purpose
To show the amazing tree that has grown unto the terrace.
Camera Techniques
The image has been taken from a frog’s view point with the taller buildings in the background it gives a good effect. It was also shot diagonal to the focus which brings some clear lines in the image.
Bridge Camera Raw
The photo has been edited in Camera Raw regarding exposure, sharpness, contrast, lighting, etc. The colours has been made stronger and the especially the colour of the flowers has been manipulated with.
Photoshop
In Photoshop the hanging lamppost has been removed together with the wire it was hanging on which went across most the image, also a red sign in the background was removed all using clone stamp tool.
* I had originally intended to change the sky with another picture as I do in portfolio picture number 24: Bello Milano. However I didn’t manage to do it before deadline for my assignment.
13: The Castellanza Square
General Information
Photo taken by: Henrik Liltorp
Camera: Nikon D3100
Copyright: Henrik Liltorp
Location: Castellanza
Date taken: 2012-04-03
Purpose
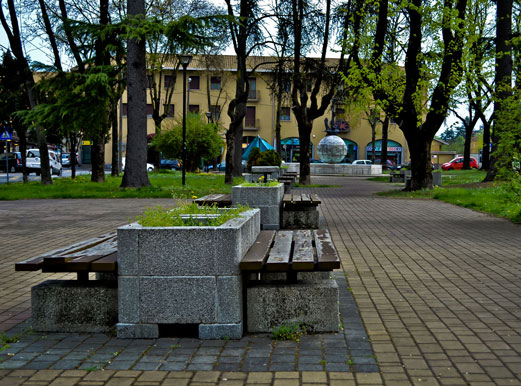
The purpose was to take a picture focusing on depth and using one of my favourite places for it.
Camera Techniques
The depth is the most important technique in this picture but also the rule of thirds has been applied with the first concrete box in the bottom left.
Bridge Camera Raw
The photo has been edited in Camera Raw regarding exposure, sharpness, contrast, lighting, colour correction etc. It has also been cropped.
Photoshop
In Photoshop I have used adjustment layers to neutralize the colour a bit including one with a mask to darken some parts of the image to make it look more natural.
14: The Roman Beats
General Information
Photo taken by: Henrik Liltorp
Camera: Nikon D3100
Copyright: Henrik Liltorp
Location: Herning
Date taken: 2012-03-11
Purpose
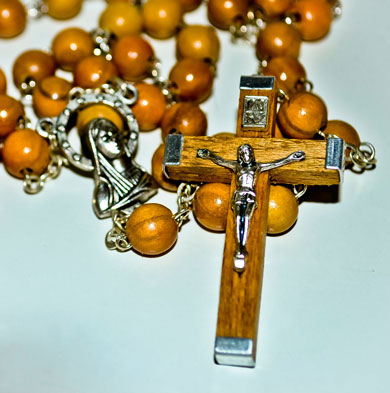
The picture was intended to be a product photography so I would have one of those as well in my portfolio.
Camera Techniques
The image has a focus on the cross, which is the centre attention point and it’s applying to the rule of thirds as well.
Bridge Camera Raw
The photo has been edited in Camera Raw regarding exposure, sharpness, contrast, lighting, colour correction etc. The image has also been cropped in Raw.
Photoshop
With clone stamp tool a lot of dirt in the background has been removed and with burn tool on low opacity the cross has been darkened a bit.
15: Riding my Bike
General Information
Photo taken by: Henrik Liltorp
Camera: Nikon D3100
Copyright: Henrik Liltorp
Location: Milan
Date taken: 2012-04-06
Purpose
I wanted to take a picture of the man as he drove past the fountain because it looked good with the contrast.
Camera Techniques
The edge of the fountain is one third up from the bottom and the man is one third in from the left. The rule of diagonals can also be applied to the image.
Bridge Camera Raw
The photo has been edited in Camera Raw regarding exposure, sharpness, contrast, lighting, colour correction etc. It has been cropped as well.
Photoshop
In Photoshop I have used an adjustment layer with a selection only on his face to lighten it and then I have removed a predominant yellow thing around his leg with clone stamp tool.
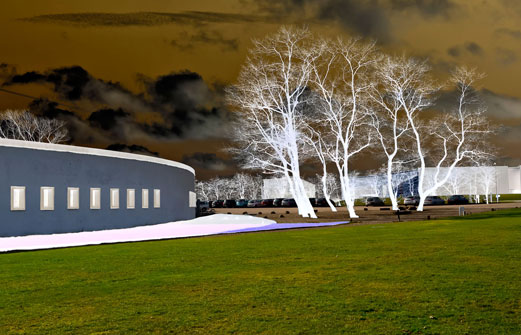
16: Yellow Sky over TEKO
General Information
Photo taken by: Henrik Liltorp
Camera: Nikon D3100
Copyright: Henrik Liltorp
Location: Birk
Date taken: 2012-03-13
Purpose
To capture all the braches on the trees just next to TEKO as well as take shot combining the trees with the round TEKO-building.
Camera Techniques
The items of interest are applied to the rule of thirds. Also there is a certain depth in the picture with the grass as foreground, trees and TEKO as centre and cars and so on as background.
Bridge Camera Raw
The photo has been edited in Camera Raw regarding exposure, sharpness, contrast, lighting, colour correction etc. It has also been cropped via Raw.
Photoshop
In Photoshop I inverted the picture with the adjustment layer invert and used a layer mask to deselect the building, grass and cars so it was only the sky and the trees that was inverted which were the parts that created the dramatic effect.
17: Il Castello Sforzesco
General Information
Photo taken by: Henrik Liltorp
Camera: Nikon D3100
Copyright: Henrik Liltorp
Location: Milan
Date taken: 2012-04-08
Purpose
The purpose was to take a good depth picture with a lot of elements in it.
Camera Techniques
The picture is taken as a landscape because it goes so deep and with the depth which is very visible with both the rounded brick tower and the grass road that is bumpy, then the image invites one to just step into it.
Bridge Camera Raw
The photo has been edited in Camera Raw regarding exposure, sharpness, contrast, lighting, colour correction etc. The bricks have been given a more reddish colour.
Photoshop
No Photoshop has been applied to this picture.
18: Signs..!
General Information
Photo taken by: Henrik Liltorp
Camera: Nikon D3100
Copyright: Henrik Liltorp
Location: Milan
Date taken: 2012-04-07
Purpose
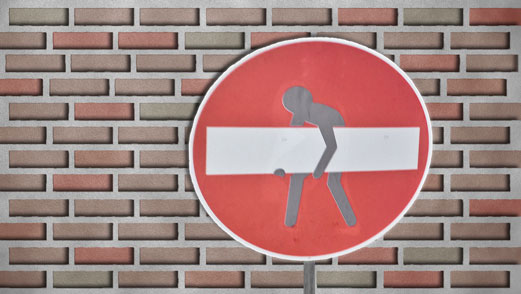
The was not that much of a purpose to this one except for it being a fun sign that I thought it could be fun manipulate with.
Camera Techniques
It has been taken from a frog’s view and a bit from the side giving it a fun perspective.
Bridge Camera Raw
The photo has been edited in Camera Raw regarding exposure, sharpness, contrast, lighting, colour correction etc. It has also been cropped and the red colour has been emphasized.
Photoshop
I reshaped the sign so it was round and then selected it. Then I made another background in another file. I chose to make bricks so it would be a sign against a brick wall instead. So I used marquee tool to make my bricks then filters to make them look like bricks followed by adding HUE/saturation adjustment layer to the bricks then made different selections so there were diversity in my brick wall. After the wall was finished I put my selected sign in it and gave it some layer styles. Now I only missed a pole to hold the sign which made with a gray selection with filters and adjustment layer curves.
19: Star Struck
General Information
DSC_0588:
Photo taken by: Henrik Liltorp
Camera: Nikon D3100
Copyright: Henrik Liltorp
Location: Milan
Date taken: 2012-04-08
DSC05727:
Photo taken by: Aslıhan Tavusbay
Camera: Sony NEX-3
Copyright: Aslıhan Tavusbay, given to Henrik Liltorp
Location: Rome
Date taken: 2011-10-31
Purpose
DSC_0588: I wanted to take a picture of the well drawn pictures with the big long street in the background.
Camera Techniques
DSC_0588: The rule of thirds has been applied and the picture also has a pretty good depth. The object of focus is clear because the background does not seem that interesting from the angle the picture is taken.
Bridge Camera Raw
DSC_0588: The photo has been edited in Camera Raw regarding exposure, sharpness, contrast, lighting, colour correction etc. It has been cropped in Raw as well.
Photoshop
DSC05727: The image has been cropped down to a portrait and then the surroundings were selected in a layer mask and painted gray. Then the entire image was added several filters to make it look drawn.
DSC_0588: The Image of me was added, resized and rotated, then replacing the image of the little girl and with some adjustments via a new bluish layer and opacity it had I made the image of me look similar in colour to the one next it. Then I used clone stamp tool to remove a few pieces of the other picture that was sticking out
20: Memory from Venice
General Information
Photo taken by: Henrik Liltorp
Camera: Samsung GT-I9000
Copyright: Henrik Liltorp
Location: Venice
Date taken: 2011-10-01
Purpose
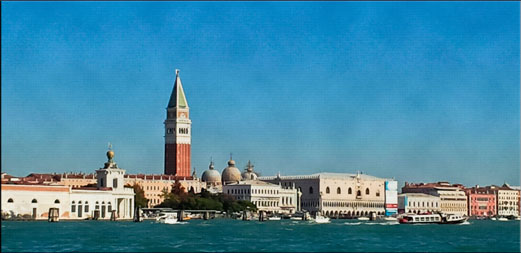
The aim with the photo was to manage to take a picture that captured the spirit of Venice. With some of the typical Venetian buildings as the main target and river taxi sailing in front the location of the picture cannot be argued.
Camera Techniques
The image is taken as a landscape picture and the tower is just about one third in from the left also the difference between sky and water is levelled out according to the rules of third so the sky takes about two thirds of the picture.
Bridge Camera Raw
The photo has been edited in Camera Raw regarding exposure, sharpness, contrast, lighting, colour correction etc.
Photoshop
In Photoshop the image has been cropped to make it more obvious that it is a landscape picture. The image was added layer style bevel and emboss to give it the antique look, followed by several filters to improve the feeling of the old postcard. Dodge and burn has been used at the end to improve minor details.
21: The Fountain
General Information
Photos taken by: Henrik Liltorp
Camera: Nikon D3100
Copyright: Henrik Liltorp
Location: Milan
Date taken: 2012-04-06
Purpose
DSC_0350: I wanted to focus on the drops on water from the fountain and of course the fountain itself.
DSC_0454:The floor mosaic I took a picture of because I thought it possible to use in another images or turning its texture in to something else changing its appearance.
Camera Techniques
DSC_0350: I went as close as possible to the focus to make the water drops as clear as possible and still have the entire fountain in the picture without destroying its look.
DSC_0454:The image have been taken from the side in a diagonal and bird’s eye view perspective which was because my original was to maybe make it into a Danish flag with another texture than the obvious mosaic.
Bridge Camera Raw
The photos have been edited in Camera Raw regarding exposure, sharpness, contrast, lighting, colour correction etc. Both images have been cropped but “DSC_0350” has been so with the straighten crop tool.
Photoshop
DSC_0350: With a selection of the sky made by a copy of the blue layer in channels that was adjusted a bit darker sky was made. With filter → render → clouds and low opacity the too light sky was made in to a sky that looks very cloudy instead of an image where the background is overexposed. Then levels were added to lighten the rest of the image a bit to make it look better together. Finally the banner was added, fitted, given some layer styles and had its edge refined.
DSC_0454: On this picture I made the canvas bigger and use the delete → fill → content aware to get rough estimate of the missing part of the banner in each end of the banner then I used clone stamp tool to correct the part of the image that I needed so could make a selection with a complete banner that I could use for the other picture. After that I rotated and distorted it so it would fit would I wanted it for, finally I used a filter on it to make it less look like a mosaic.
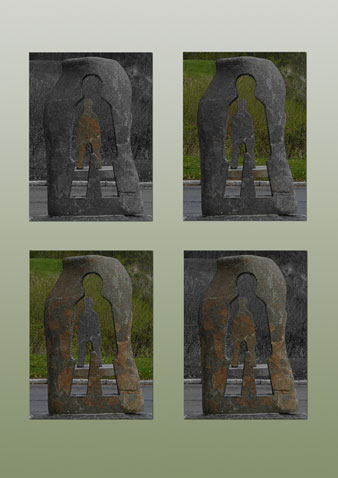
22: The Collage
General Information
Photo taken by: Henrik Liltorp
Camera: Nikon D3100
Copyright: Henrik Liltorp
Location: Milan
Date taken: 2012-04-08
Purpose
I wanted to capture the interesting sculpture and then I just hoped I could use it for something good…
Camera Techniques
I took the image on my knees directly at the foot of it trying to get as much as possible of it, so it would only be that and sky. This succeeded and has given a good contrast.
Bridge Camera Raw
The photo has been edited in Camera Raw regarding exposure, sharpness, contrast, lighting etc. The colours of the sculpture have been emphasized.
Photoshop
I have removed all the dirt on the sculpture with clone stamp tool, and then I gave it black/white adjustment layer. With that I made several selections with brush tool in layer mask, which gave me more versions of the same image. Next I made a new file where I put all the images together in, this file has gradient background and when I inserted the images I gave them some layer styles.
23: The Diversity of a Candlelight
General Information
Photo taken by: Henrik Liltorp
Camera: Nikon D3100
Copyright: Henrik Liltorp
Location: Herning
Date taken: 2012-03-11
Purpose
The purpose of this photo is to show how my candlelight has developed in less than a month when it has not been disturbed by taking edges off it.
Camera Techniques
The picture is taken from bird’s eye view, so depth in the candle is being underlined.
Bridge Camera Raw
The photo has been edited in Camera Raw regarding exposure, sharpness, contrast, lighting, colour correction etc. It has been cropped as well. The red, orange and yellow have been neutralized a bit so they do not appear to strong.
Photoshop
In Photoshop I have used an adjustment layer to lighten it a bit except for the flame which I selected with a mask. A shadow has been lightened a bit with the dodge tool.
24: Bello Milano
General Information
Photos taken by: Henrik Liltorp
Camera: Nikon D3100
Copyright: Henrik Liltorp
Location: Milan (DSC_0327) & Herning (DSC_0020)
Date taken: 2012-04-06(DSC_0327)
Date taken: 2012-04-22(DSC_0020)
Purpose
DSC_0327: I wanted to take a picture of the tree with cathedral in the background because there was a good harmony.
DSC_0020: I wanted some pictures of a sky with some interest and diversity with both blue sky and clouds that I could use in other images.
Camera Techniques
DSC_0327: The rule of thirds is applied with the sky taking the left third. The picture also has a nice depth with the phones and the tree in the foreground, the cathedral in the centre and the sky and the buildings on the other side of the square in the background.
Bridge Camera Raw
The photos have been edited in Camera Raw regarding exposure, sharpness, contrast, lighting, colour correction etc. With image “DSC_0327” the red colours have been emphasized and the image has been cropped.
Photoshop
DSC_0327: With Photoshop the sky on the image has been selected via channels where an adjustment has been made in a copy of the blue layer. The selection was then used to determine were another sky needed to be put in, which was then done and the edges was then feathered to blend more natural.
25: My Icon
Purpose
I decided to use the opportunity of the portfolio assignment to make an icon for myself. The icon I will now most likely use for a possible website that I will make in the future. Besides that I also chose to make an icon because it gives me some design that within a level that I’m capable of making within the time limit.
Photoshop
My icon is an orb with square inside with my initials. The orb has been created from a background layer via filters, most importantly filter→render→clouds which makes the main effect on the background. Then I have painted some small dots and lines with low opacity and a small brush to break pattern. The dodge and burn tools have been used for lighten and darken different parts of the orb. The last thing that was added to the orb was layer styles. For the square I used the rounded rectangle tool and gave it a small stroke made a copy which has mode set to overlay and a low opacity. The text is written is the type called “Algerian” and has the same layer styles as the orb. Finally I coloured the orb with HUE/Saturation adjustment layer.
* Besides images there also had to be pure graphics in my portfolio e.g. icons as this.
26: Visitvenice.com Website
General Information
Photos taken by: Henrik Liltorp
Camera: Samsung Galaxy GT-I9000
Copyright: Henrik Liltorp
Location: Venice
Date taken: 2011-11-01
Purpose
Venice trip 079: To take a picture of the reflection from the water together with the gondola.
Venice trip 087: To take a picture of the most famous bridge in Venice and capture the boats.
Camera Techniques
Venice trip 079: The picture has been taken from a weak bird’s eye view to give another perspective to it. It has also a diagonal angle to make it more interesting.
Venice trip 087: The picture has been applied to the rule of thirds with the boat and it has been shot in a diagonal angle compared to the main focus (the bridge)
Bridge Camera Raw
The photos have been edited in Camera Raw regarding exposure, sharpness, contrast, lighting, colour correction etc. Image “Venice trip 087” has been cropped as well.
Photoshop
Venice trip 079 & 087: “Venice trip 079” has been edited in Photoshop with the clone stamp tool where I have removed the dirt and garbage that was in the image. Also both images have been saved for web before I used them in the layout.
Website layout: My website is made with all web colours where a gray background has gotten a couple of filters. On top there is a banner made with the rounded rectangle tool and which has some layer styles, some stars brushed on and some filters that makes it appear nicer. The text has been written with “lucida handwritten” and has been curved. The buttons has basically been created in the same way as the banner except they have an inner glow with a gradient on them. The pictures has been put in and has got some layer styles to receive the same feeling as the rest as the layout including a stroke to make a clear identification for where the pictures end. The footer is a selection that has the same layer styles as the buttons. Finally some text from Lorem Ipsum has been put in to complete it.
* Another requirement for my portfolio was at least one website layout I have included two: number 26 & 27.
27: My Website
General Information
Photo taken by: Ryan Luntz
Camera: Nikon D3100
Copyright: Henrik Liltorp
Date taken: 2012-03-13
Purpose
To get a picture of me for the portfolio as well, which were taken by one of my friends, which I could use.
Camera Techniques
The rule of thirds has been applied were both the rows of stone sculptures are following it seen from each side. The sculptures also help create a great depth from where the picture is taken.
Bridge Camera Raw
The photo has been edited in Camera Raw regarding exposure, sharpness, contrast, lighting, colour correction etc.
Photoshop
The Picture: In Photoshop I have used channels for the blue layer to adjust the sky and make it lighter and selected it and paste it in a new layer putting the selection in.
The Website Layout: For the website only web colours have been used. The background was created with a brown colour with several filters and a copied layer on top with mode multiply and a lower opacity. The icon that I’d made was inserted in the top left an added a drop shadow. Next to it an ellipse shaped top bar was made with the same height as the icon and given several layer styles and set to a very low opacity. The buttons for the links was created the same way but have a higher opacity than the top bar and an inner glow. The image has been inserted and given some layer styles. Then I added two thumb tacks in the two top corners of the picture to make it seem like it has been clipped on. At the end footer has been created and the dodge and burn tools have been used for changing the last small details making a few parts darker and lighter.
* This was how I picture my website front page should look in 2012…
OLD PORTFOLIO
I also made a Photoshop portfolio on 2nd semester, which was at the time I learned Photoshop. I will include some of these images but honestly there are some that’s too bad to display and obviously showing that I was a beginner at the time. What I have displayed contains of 7 images and 1 graphic. There will be more stock photos in this portfolio because photoshop was the main objective for this assignment, where as for the other it were photography and photoshop.
Old-01: Giraffes on the Savannah
General Information
SP_A02254:
Photo taken by: Henrik Liltorp
Camera: Samsung Ultra Music F300 Moblie
Copyright: Henrik Liltorp
Location: Ree Park
Date taken: 2009-07-15
1208638_64685362:
Photo taken from: Stock
Camera: Unknown
Copyright: No Copyright
Date taken: 2009-07-12
Link: http://www.sxc.hu/browse.phtml?f=download&id=1208638
Purpose
SP_A02254: To take a picture of the young giraffe from a good angle.
1208638_64685362: To find a picture I could combine the picture with and use as a base.
Camera Techniques
SP_A02254: The picture is applying the rule of thirds.
Bridge Camera Raw
The photos have been edited in Camera Raw regarding exposure, sharpness, contrast, lighting, colour correction etc.
Photoshop
Quick selection tool to select the extra giraffe,
Filters for sharpening (Other – High pass),
Brightness/contrast, curves & levels to fit the colours of the 2nd giraffe to the image and the 1st giraffe.
Refine edge to make a natural look on the inserted calf, Brush tools and layer masks to make markerings for the natural light and shadow.
Old-02: Ree Park Poster
General Information
P7150039:
Photo taken by: Henrik Liltorp
Camera: Olympus μ600
Copyright: Henrik Liltorp
Date taken: 2009-07-15
ReePark-logo:
Photo taken from: Ebeltoft City’s website
Camera: Unknown
Copyright: Ree Park
Link: https://www.ebeltoftby.dk/
Purpose
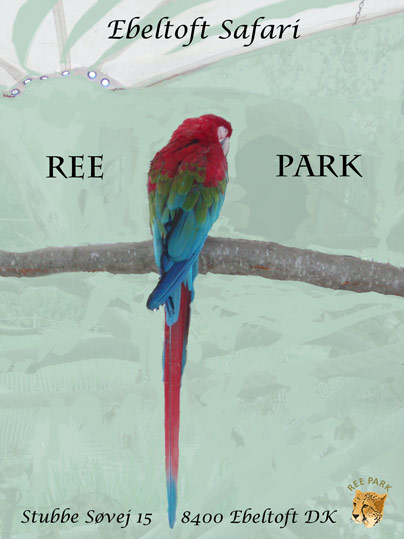
Holiday picture from Ree Park, where I got the idea to make it into an ad of some sort.
Bridge Camera Raw
The photo has been edited in Camera Raw regarding exposure, sharpness, contrast, lighting, colour correction etc.
Photoshop
Filters for sharpening,
Layer masks and brush tools to select the parrot and give a nice form of blurry view from the green background layer,
Quick selection tool has been used to select the logo, and then inserting it
Text for the finishing touches.
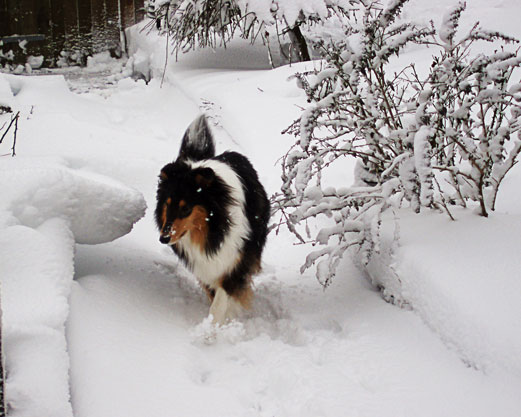
Old-03: Pinta in the Snow
General Information
P2220005:
Photo taken by: Karin Liltorp
Camera: Olympus μ600
Copyright: Given to Henrik Liltorp
Location: Skive
Date taken: 2007-02-22
Purpose
Take pictures of our dog Pinta in the snow.
Photoshop
Filters for sharpening
Levels to make the image lighter and clearer,
curves to lighten the dog,
brush tools to select dog,
Crop,
Gradient to make corners darker
Old-04: Storm over Tower Bridge
General Information
1108649_24517411- tower bridge:
Photo taken from: Stock Image
Camera: Unknown
Copyright: No Copyright
Date taken: 2008-11-08
Link: http://www.sxc.hu/browse.phtml?f=download&id=1108649
858070_23778306 – lightning:
Photo taken from: Stock Image
Camera: Unknown
Copyright: No Copyright
Date: Unknown
Link: http://www.sxc.hu/browse.phtml?f=download&id=858070
Purpose
Finding 2 images that I could combine in a cool way, already having the idea to use some sort of weather phenomenon.
Photoshop
Filters for sharpening,
Curves to make the sky look better,
Layer mask to make sure the effect only works for the sky,
Quick selection tool has been used to select the lighthings, and then inserting them,
Brush tool to make the extra details on the lightnings,
Inner glow effect on inserted lightnings.
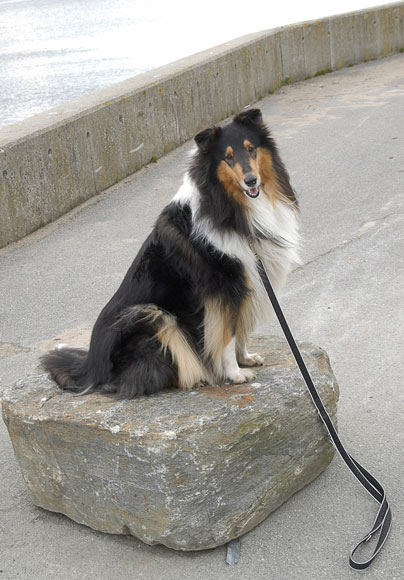
Old-05: Portrait of Pinta at the Harbour
General Information
DSC_0078:
Photo taken by: Henrik Liltorp
Camera: Nikon D100
Copyright: Henrik Liltorp
Location: Skive
Date taken: 2010-05-01
Purpose
Take some kind of a portrait picture.
Camera Techniques
Rule of golden mean; leash and harbour edge creates the 3 parts of the image
Photoshop
Crop to remove noisy elements,
Filters for sharpening
Old-06: Rustic Idyll
General Information
DSC_0035:
Photo taken by: Henrik Liltorp
Camera: Nikon D100
Copyright: Henrik Liltorp
Date taken: 2010-05-02
Purpose
Nature pictures for portfolio
Photoshop
Filters for sharpening,
Curves to make more contrast,
Levels to make the image darker and clearer,
Hue/Saturation to make the image more colourful,
Text used with vanishing point.
Old-05: Collage of a Traffic Circle
General Information
DSC_0034:
Photo taken by: Henrik Liltorp
Camera: Nikon D100
Copyright: Henrik Liltorp
Location: Skive
Date taken: 2010-05-01
Purpose
Take interesting picture for portfolio.
Camera Techniques
Rule of thirds
Photoshop
Filters for sharpening,
Crop to focus on the stone man,
Brush tool and layer masks,
Black & white tool to make focus on different things in the image,
Rulers to make things look straight,
Gradients with noise on background to make an easy looking back,
Effects – drop shadow to make things look more smooth.
Old-08: Lighting Orb Icon
General Information
Lighting-orb.psd:
Copyright: Henrik Liltorp
Photoshop
Rounded rectangle with rainbow coloured gradient overlay, satin, drop shadow, bevel and emboss, and stroke effects,
Circle with gray & white gradient, drop shadow, bevel and emboss, stroke, inner shadow, and inner glow effects,
Lightning with yellow gradient, drop shadow, bevel and emboss, stroke, inner shadow, and inner glow effects,
Brush tool with inner glow to create cracking,
Text for name with drop shadow, bevel and emboss, stroke, and gradient overlay effects.

